Plants

Plants is one of the six Carbon TIME units. If you are new to teaching Carbon TIME, read the Carbon TIME FAQ: Which Units Should I Teach.

The Plants Unit supports students in using core disciplinary ideas, science practices, and cross-cutting concepts to develop scientific explanations of how different plants transform matter and energy as they grow, move, and function.

Follow these steps to get ready to teach the Plants Unit.

Lead Editor for 2019 Version

Kirsten D. Edwards, Department of Teacher Education, Michigan State University

Principal Authors

Kirsten D. Edwards, Department of Teacher Education, Michigan State University

Christie Morrison Thomas, Department of Teacher Education, Michigan State University

Elizabeth Tompkins, Michigan State University

Hannah K. Miller, Northern Vermont University

Christa Haverly, Department of Teacher Education, Michigan State University

Charles W. “Andy” Anderson, Department of Teacher Education, Michigan State University

Contributing Authors

Beth Covitt, Jenny Dauer, Jennifer H. Doherty, Allison Freed, Wendy Johnson, Deborah Jordan, Craig Kohn, Lindsey Mohan, Joyce Parker, Emily Scott, Carly Seeterlin, Alex Walus, Nicholas Verbanic, Pingping Zhao

Illustrations

Craig Douglas, Kendra Mojica

This research is supported in part by grants from the National Science Foundation: A Learning Progression-based System for Promoting Understanding of Carbon-transforming Processes (DRL 1020187) and Sustaining Responsive and Rigorous Teaching Based on Carbon TIME (NSF 1440988). Any opinions, findings, and conclusions or recommendations expressed in this material are those of the author(s) and do not necessarily reflect the views of the National Science Foundation or the United States Department of Energy.

Contact the MSU Environmental Literacy Program for more information: EnvLit@msu.edu.

The Driving Question

The Plants Unit starts by asking students to express their ideas about the driving question about an anchoring phenomenon: How does a radish plant grow, move, and function?

Carbon is the key! In the unit, students learn to tell the story of how matter and energy are transformed as they move through plant systems. A particularly powerful strategy for explaining how plant systems transform matter and energy involves tracing carbon atoms. For more information about the Next Generation Science Standards disciplinary core ideas included in this unit see the sections on the Matter Movement, Matter Change, and Energy Change Questions below and the Unit Goals.

Research base. This unit is based on learning progression research that describes the resources that students bring to learning about plants and the barriers to understanding that they must overcome. It is organized around an instructional model that engages students in three-dimensional practices.

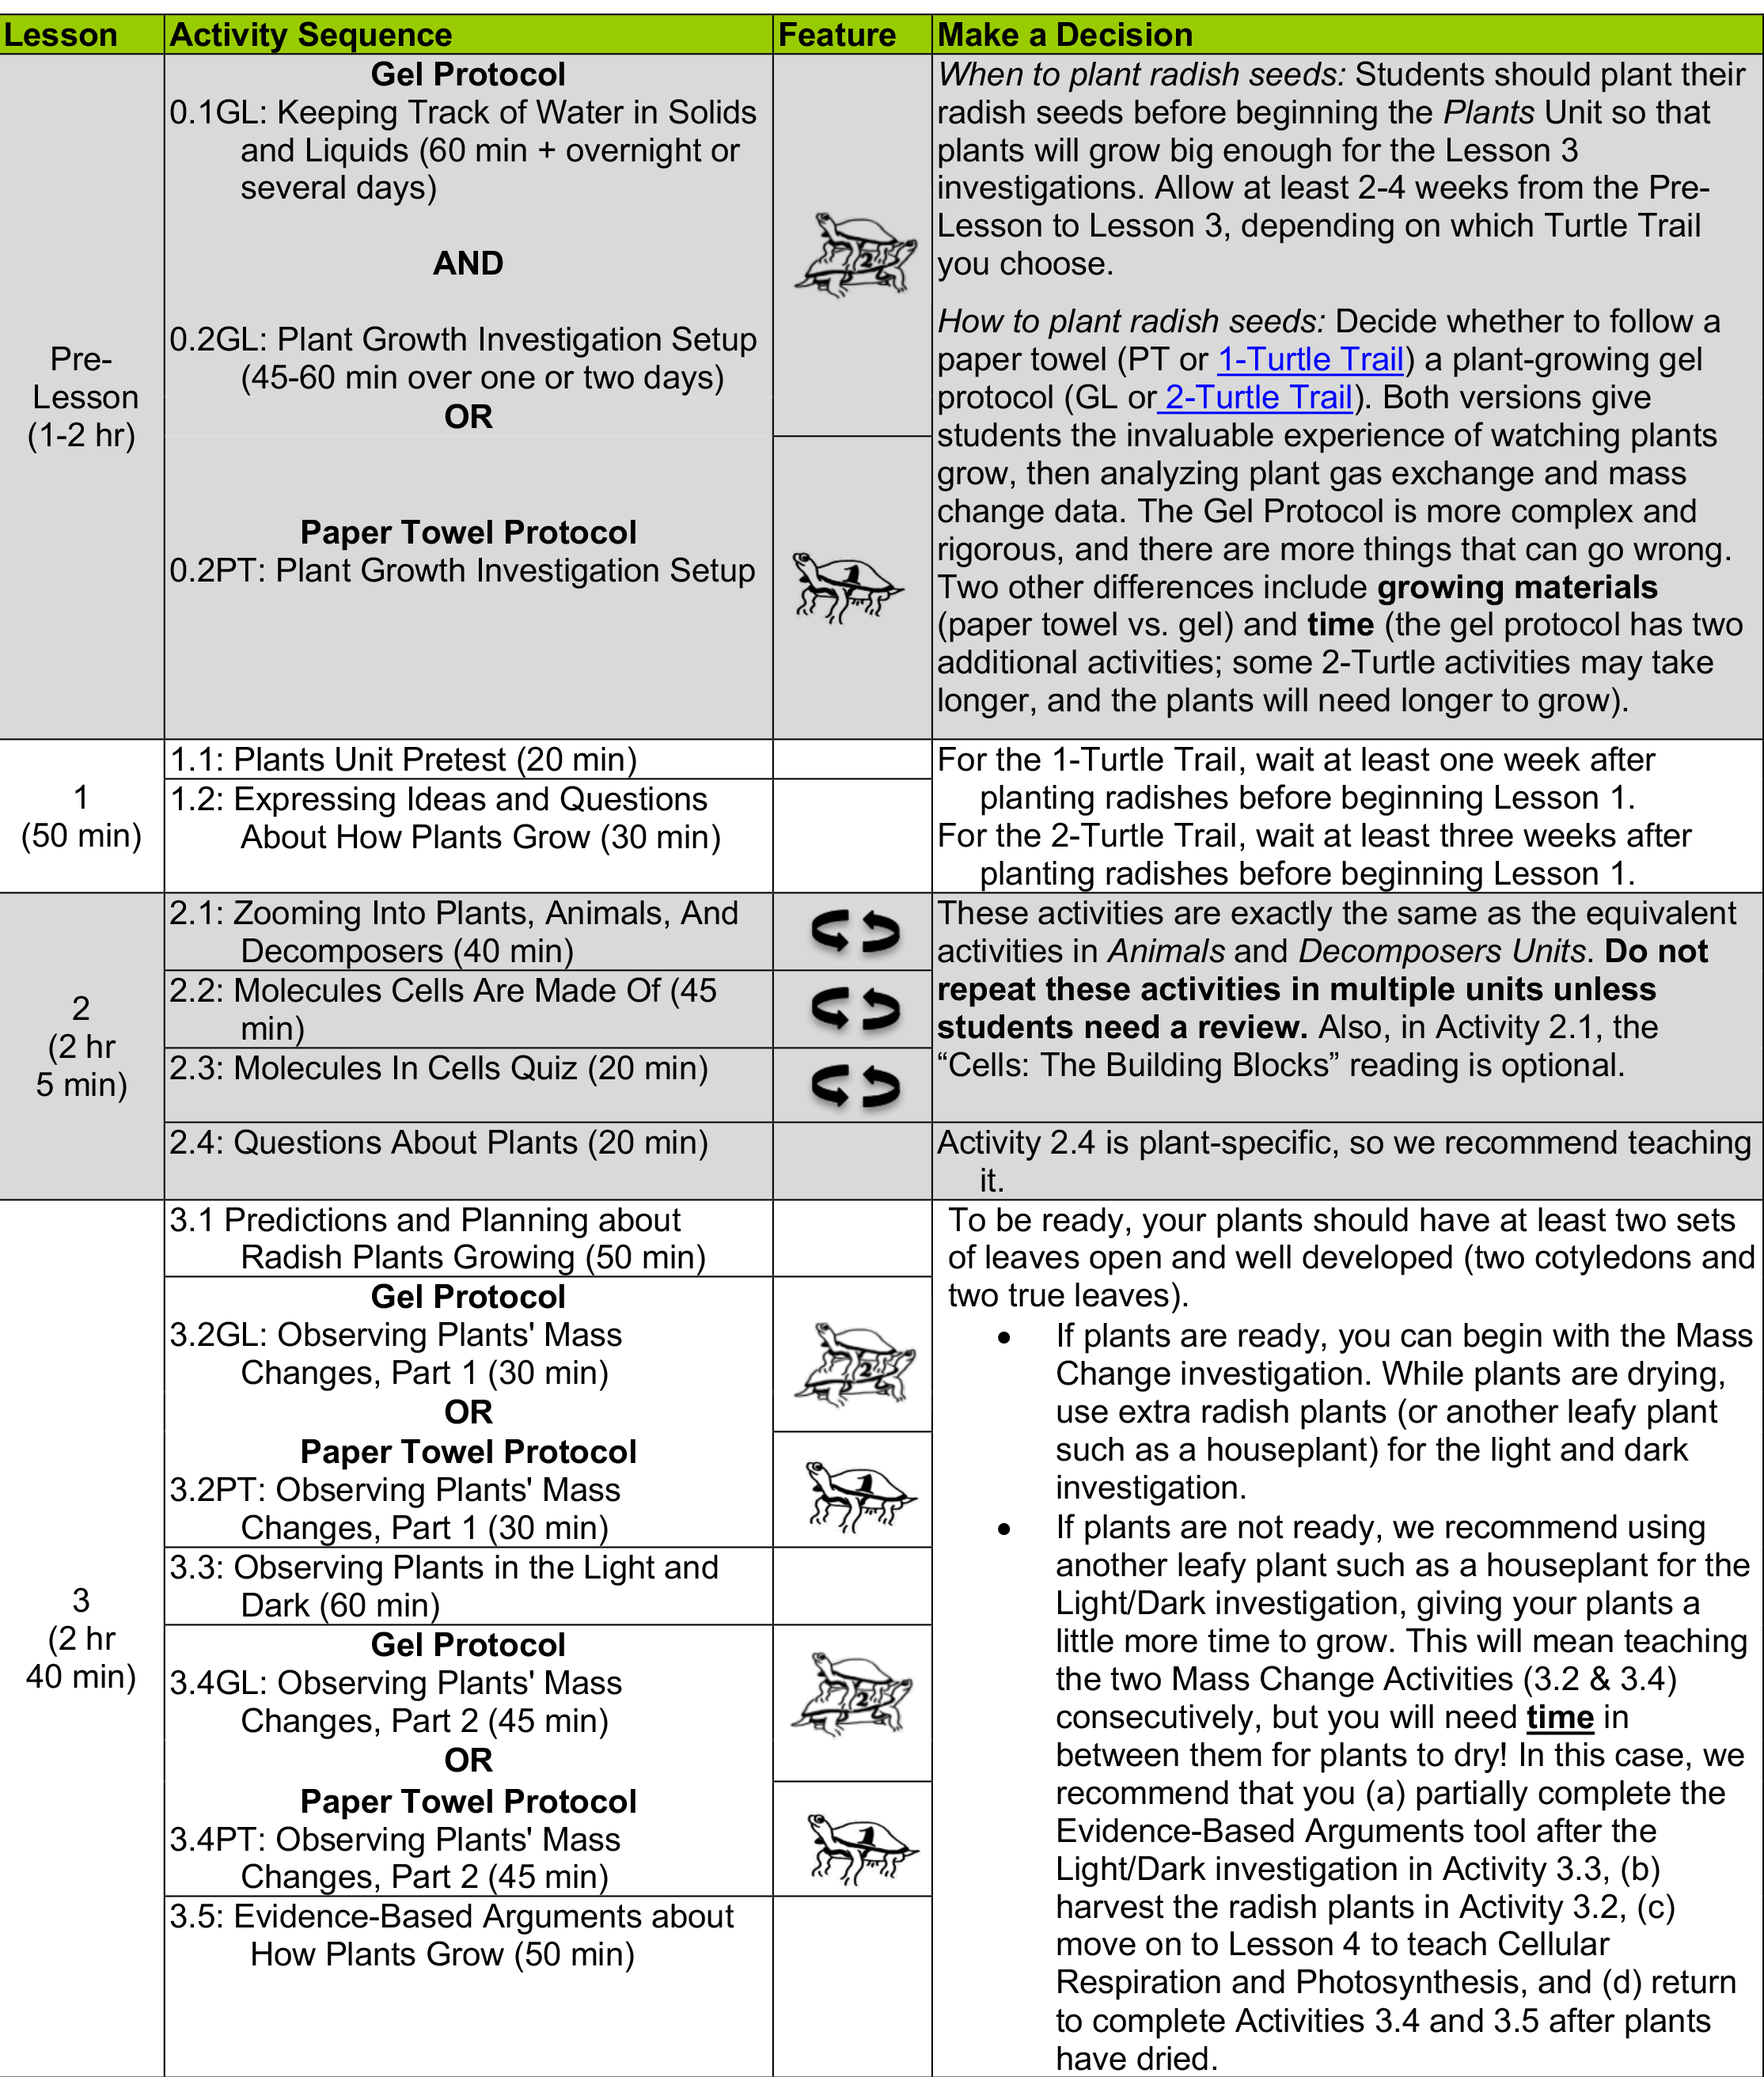
Before beginning the Plants Unit, you need to decide what to teach and importantly, what not to teach! Use this page to choose the unit sequence that’s most appropriate for your students.

  • Some activities are REPEATING ACTIVITIES (). Omit these activities if students have already completed them in another unit (unless you’d like students to repeat them as review).
  • Other activities are TWO-TURTLE ACTIVITIES (), which place a higher demand on students. Decide whether the higher demand required by these activities will be useful or distracting for your students. The Carbon TIME Turtle Trails Document document provides further info about choices for making units more or less demanding, depending on your students’ needs.

Unless otherwise noted in the table below, all activities in the unit should be taught.

Here, we present two ways to think about how lessons are sequenced in the Plants Unit. The Instructional Model, immediately below, emphasizes how students take on roles of questioner, investigator, and explainer to learn and apply scientific models they can use to answer the driving question. Further below, the Unit Storyline Chart highlights the central question, activity, and answer that students engage with in each lesson of the Plants Unit.

Instructional Model

Like all Carbon TIME units, this unit follows an instructional model (IM) designed to support teaching that helps students achieve mastery at answering the driving question through use of disciplinary content, science practices, and crosscutting concepts. To learn more about this design, see the Carbon TIME instructional model.

plants unit map

The core of the Carbon TIME IM is the Observation, Patterns, Models (OPM) triangle, which summarizes key aspects to be attended to as the class engages in unit inquiry and explanation. The OPM triangle for the Plants Unit, shown below, articulates the key observations students make during the unit investigation, the key patterns they identify through analyzing their investigation data, and the central scientific model that can be used to answer the unit’s driving question. During the inquiry portion of the unit (Lesson 3), the class moves from making observations to identifying patterns, eventually using these patterns to make evidence-based arguments. During the explanation portion of the unit (Lessons 4, 5, and 6), the class learns the atomic-molecular model, makes connections across scales, and uses the atomic-molecular model to explain how animals grow, move, and function. Across the unit, classroom discourse is a necessary part of 3-dimensional Carbon TIME learning. The Carbon TIME Discourse Routine document provides guidance for scaffolding this discourse in lessons.

plants overview

The tables below show goals for this unit in two forms. A list of Next Generation Science Standards (NGSS) addressed by this unit is followed by a table showing specific target performances for each activity.

Next Generation Science Standards

The Next Generation Science Standards (NGSS) performance expectations that middle and high school students can achieve through completing the Plants Unit are listed below. To read a discussion of how the Carbon TIME project is designed to help students achieve the performances represented in the NGSS, please see Three-dimensional Learning in Carbon TIME.

High School

  • Chemical Reactions. HS-PS1-4. Develop a model to illustrate that the release or absorption of energy from a chemical reaction system depends upon the changes in total bond energy.
  • Chemical Reactions. HS-PS1-7. Use mathematical representations to support the claim that atoms, and therefore mass,are conserved during a chemical reaction.
  • Structure and Function. HS-LS1-2. Develop and use a model to illustrate the hierarchical organization of interacting systems that provide specific functions within multicellular organisms.
  • Matter and Energy in Organisms and Ecosystems. HS-LS1-7. Use a model to illustrate that cellular respiration is a chemical process whereby the bonds of food molecules and oxygen molecules are broken and the bonds in new compounds are formed resulting in a net transfer of energy.

Middle School

  • Chemical Reactions. MS-PS1-2. Analyze and interpret data on the properties of substances before and after the substances interact to determine if a chemical reaction has occurred.
  • Chemical Reactions. MS-PS1-5. Develop and use a model to describe how the total number of atoms does not change in a chemical reaction and thus mass is conserved.

Resources You Provide

Pre-Activity 0.1GL: Keeping Track of Solids in Mixtures

You can do the investigation with students collecting their own data or with data coming from whole class demonstrations. Materials lists for each are below.

For whole-class demonstrations:

  • Calculators (1 per pair of students)
  • Dry sponge
  • Salt (about 100 g)
  • Dry plant gel crystals (1 packet per class)
  • Baby carrot
  • Salt water mixture (about 10 g of salt in 50 ml of water)
  • Ionic Grow (4 teaspoons, about 17 g; plus an additional 4 teaspoons to make a mixture, see Setup below)
  • Distilled Water (1 gallon per class)
  • Glass Petri dishes (3)
  • Digital Scale
  • Scissors or knife
  • Strainer/colander large enough for hydrated gel (1 per class)
  • Bucket or bowl (>1 gallon) to hydrate gel overnight (1 per class)

For students working in pairs:

  • Dry sponge (1 per pair of students)
  • Salt (1t per pair of students)
  • Dry plant gel crystals (1 packet per class)
  • Baby carrot (1 per pair of students)
  • Salt water mixture (about 1 cup of salt in 4 cups of water)
  • Ionic Grow (1t per pair of students; plus an additional 4 teaspoons to make a mixture, see Setup below)
  • Distilled Water (1 gallon per class)
  • Small bowls, preferably transparent (3 per pair of students)
  • Petri dish (3 per pair of students)
  • Digital Scale (1 per pair of students)
  • Calculator (1 per pair of students)
  • Scissors or knife (1 per pair of students)
  • Tape and marking pens (enough for container labels)
  • Strainer/colander large enough for hydrated gel (1 per class)
  • Bucket or bowl (>1 gallon) to hydrate gel overnight (1 per class)

Pre-Activity 0.2GL: Plant Growth Investigation Setup

  • Large (37mL) test tubes or other clear receptacle (1 per student)
  • 1 packet of gel crystals (hydrated already if completed pre-lesson 1.1) (1 per class)
  • 4 teaspoons of Ionic Grow (1 per class – not necessary if completed pre 1.1)
  • Gallon of distilled water (1 per class – not necessary if completed pre 1.1)
  • Bucket or bowl (>1 gallon) to hydrate gel overnight (1 per class – not necessary if completed pre 1.1)
  • Strainer/colander large enough for hydrated gel (1 per class- not necessary if completed pre 1.1)
  • Digital scale (to 0.1g) (1 per group)
  • Grow/Fluorescent Light
  • Test tube rack
  • Permanent markers and labels for test tubes
  • Fresh packets of radish seeds (at least one seed per student or group plus a few more)
  • Squeeze bottle to water plants

Pre-Activity 0.2PT: Plant Growth Investigation Setup

  • Small (e.g. 7X10 cm or ramekin) aluminum container (1 per student group)
  • 20 radish seeds (1 per student group)
  • 15 cm of cotton yarn (1 per student group)
  • Brown paper towel (1 roll or 2-3 sheets each student group) Note: brown, unbleached paper towel is required
  • Markers/masking tape to label containers (1 per student group)
  • A balance to measure masses (1 per student group)
  • Large trays with at least 5 cm sides to put the containers in and hold water.(enough for all containers per class)
  • Grow lights (highly recommended)
  • 1 L of water (for starting seeds)
  • 4 L of water with dilute nutrients. (E.g. Ionic Grow, Miracle Grow, etc.) for use once seeds have sprouted.

Activity 1.1: Plants Unit Pretest

  • pencils (1 per student)

Activity 1.2: Expressing Ideas and Questions about How Plants Grow

Activity 2.1: Zooming into Plants, Animals, and Decomposers

Activity 2.2: Molecules Cells Are Made of

Activity 2.3: Molecules in Cells Quiz

  • pencils (1 per student)

Activity 2.4: Questions about Plants

Activity 3.1: Predictions and Planning about Radish Plants Growing

Activity 3.2 (PT or GL): Observing Plants’ Mass Changes, Part 1

  • Containers of radish plants from the Pre-Lesson (1 per group)
  • Digital scale (1 per group)
  • Small paper bags or envelopes for drying plants (1 per container)
  • Sunny windowsill or drying oven (domestic ovens work at low settings)
  • Markers to label plants by student or group (1 per group)
  • Tubes of radish plants from the Pre-Lesson (1 per student)
  • Digital scale (1 per group)
  • Small containers to collect gel from individual tubes to mass.
  • Small paper bags or envelopes for drying plants (1 per plant)
  • Sunny windowsill or drying oven (domestic ovens work at low settings)
  • Markers to label plants by student or group (1 per group)

Activity 3.3: Observing Plants in the Light and Dark

  • Radish plants (either in tubes (GL) or containers (PT) from the Pre-Lesson. Note: 3-4 tubes or 1-2 containers will be plenty for each experiment replicate.
  • Dark box, thick black trash bag, or very dark closet (1 per class)
  • Fluorescent grow light or sunny windowsill (1 per class)
  • Label (1 per group student group)
  • Petri dish with blue BTB (1 per container/student group)
  • Petri dish with yellow BTB (1 per container/student group)
  • Sealable 6.8 liter (or 29 cup) container (1 per group)
  • (From previous lesson) 3.1 Predictions and Planning Tool for Plant Investigations with student answers

Activity 3.4 (PT or GL): Observing Plants’ Mass Changes, Part 2

Activity 3.5: Evidence-Based Arguments about Plants

Activity 4.1: Molecular Models for Potatoes Moving and Functioning: Cellular Respiration

Activity 4.2: Explaining How Plants Move and Function: Cellular Respiration

Activity 4.3: Molecular Models for Potatoes Making Food: Photosynthesis

  • Molecular modeling kit (1 per pair of students; includes 6 carbon atoms, 12 hydrogen atoms, 18 oxygen atoms, 36 or more bond links)
  • Twist ties (12 per pair of students)
  • Scissors (1 per pair of students)

Activity 4.4: Explaining How Plants Make Food: Photosynthesis

Activity 5.1: Tracing the Process of Potatoes Growing: Biosynthesis

Optional Activity 5.2: Molecular Models for Potatoes Growing: Biosynthesis

  • Scissors (1 per pair of students)
  • Removable or re-stick tape (1 dispenser per pair of students)

Activity 5.3: Explaining How Potato Plants Grow: Biosynthesis

Activity 6.1: Explaining Other Examples of Plants Growing, Moving, and Functioning

Activity 6.2: Functions of All Plants

  • computers (1 per pair of students, for option 2 in step 2)
  • blank posters (1 per pair of students or small group, for option 3 in step 2

Activity 6.3: Comparing Plants and Animals

Activity 6.4: Plants Unit Posttest

  • pencils (1 per student)